In this article, I will describe the two techniques I use to trail my stop-loss in an open trade.
There are many ways to trail your stop-loss, and it may be that the two techniques I use do not match the strategy you are trading. I just explain how I do it myself, and you can use it as inspiration.
First, a small section about the actual trailing stop-loss.
Trailing of stop loss – what, why, and when?
(If you know what a trailing stop-loss is, skip this section)
To “trail” your stop loss means to move the stop-loss that you originally entered. Trailing the stop-loss is just a form of risk management. The meaning of Dynamic R is a key concept to understand why you would like to trail your stop-loss. Therefore, read this article about Dynamic R, otherwise the rest of the article will not make much sense. Now for the example of what a trailing stop-loss is.
Let’s say that Johnny has bought XYZ at price 100 and put a stop-loss for the trade at price 80. After some time, XYZ has risen to 150. At this point Johnny is not only risking the 20 points (1R) that he had as risk at the starting point, but also the entire open profit. In reality, Johnny can close the trade and secure a 50-point (2.5R) gain. But let’s say that Johnny believes that XYZ must rise to at least 200 where he has set his target. Therefore, Johnny does not close his trade but instead of risking all his open profits as well as a potential loss of capital, Johnny chooses to move up the stop loss to 120. There may be many different reasons why it’s 120, but he has secured himself against a loss on his capital, while he has locked a bit of his win if XYZ should drop. Johnny’s position is now that he has secured 1R in profit while still having the possibility of a 2.5R gain in case that XYZ should rise to his target at 200.
This is an example of trailing a stop-loss, i.e. when you choose to move the original stop-loss to reduce the risk and / or to lock in some of the open profits.
Why and when should you trail your stop-loss?
It is not an absolute truth that it is a good idea to trail the stop-loss in trading. It’s an art to make it effective, and there are several cons when trailing the stop-loss, no matter what technique you’re using. It depends much on one’s strategy and how you trade. For example, following 1R targets, it can be very difficult to trail the stop-loss advantageously (according to my experience). It is also important to keep in mind that there is a risk associated with trailing the stop-loss, namely that you can get stopped out, after which the market turns around and hits your target. If it happens a lot of the time, you should either not trail your stop-loss or possibly use another technique. For example, if you often go for a 6R target and get stopped out for + 1R and the market then turns around and hits your target, it’s a very bad business to trail your stop-loss.
But let’s assume that you have a 6R target and your trade is up with + 5.5R. If you still have your stop-loss at the outset, I would call this an extremely bad decision, because you risk much more than what you can win (unfavorable asymmetric Reward: Risk scenario. In fact, Risk: Reward in this Scenario is 1: 0.09 – not a good position to be in). So, we can generally say that when the Dynamic R becomes low (under 0.5R, approximately.), It’s time to trail the stop-loss to minimize the risk and possibly lock in some of the open profit. Again, it is very different from trading methodology to trading methodology if trailing the stop-loss is good for the bottom line.
Two techniques for trailing the stop-loss
Now we come to the practical. I use two techniques to trail my stop-loss. However, I trade four different strategies, and I do not use the two techniques on all strategies – only one of them where I use both techniques at the same time. In this section, I am based on my own version of Hans-Henrik’s fractal line strategy.
21EMA
The first thing to look at is 21EMA. I use the 21-point exponentially moving average to trail my stop-loss (quite practical, it’s not a trailing stop-loss, but for convenience sake, we call it that) when I trade breakouts of fractal trendlines on the 15-min graph. As I only trade with the trend, EMA is a good tool for both determining the trend and for trailing my stop-loss. Why 21? Because I already make use of 21EMA and the length fits the strategy – I will not get stopped out too fast or too slowly. The rule is that if I’m short and the price at any time closes over 21EMA, I’ll exit the trade. The opposite applies to long positions.
Example of a winning trade:
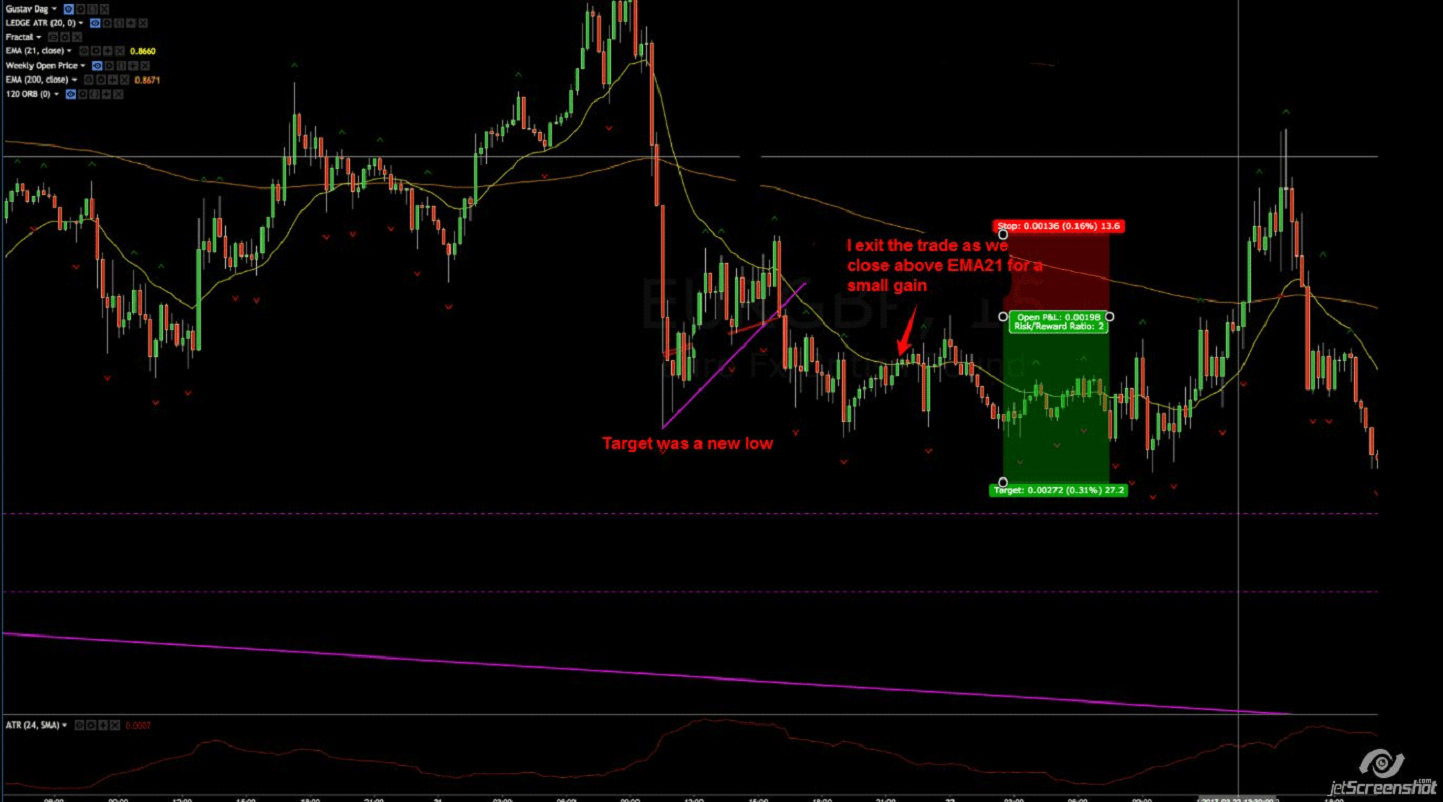
As you can see, the market does not reach my target before it hits my stop-loss. If I had not exited my trade when we closed above the 21EMA I had been taken out with a full loss (-1R).
Example of a losing trade:
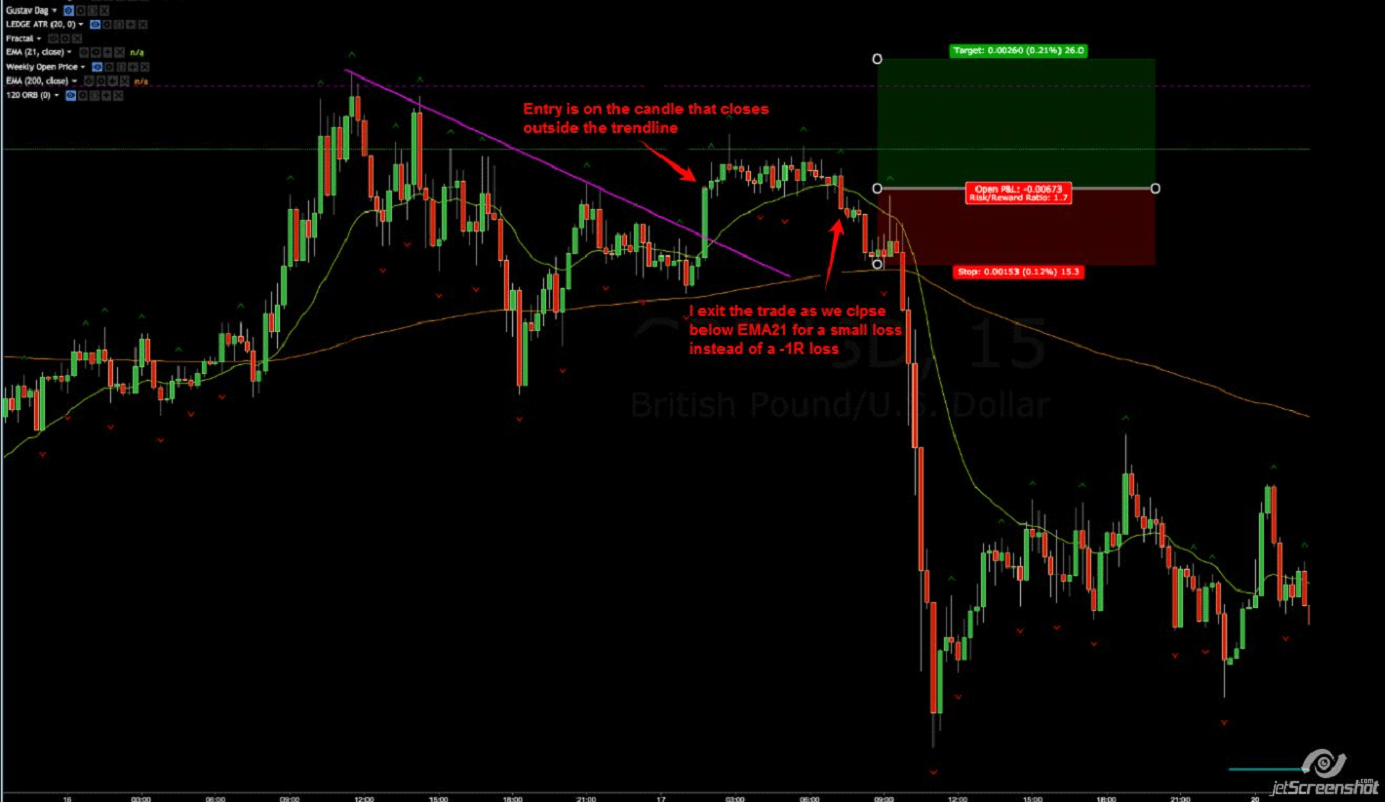
21EMA is a super simple technique that I’m happy to use. It is very good to get out of business early where you can come out with a smaller loss than the full 1R loss. 21EMA is a very good technique for inexperienced traders / beginners as there is no way to disturb it by making bad decisions. It is a very mechanical strategy that is easy to handle. However, there are also disadvantages to it. For example, one might find that the Dynamic R can become very small without doing anything about it. Therefore, I also use another technique in conjunction with this, a so-called “structural stop”.
Structure stop
Structure stop could also be called support / resistance stop. It is the kind of trailing stop-loss that I usually use in my trades. I use this technique on three of the four strategies I trade (the fourth I do not use a trailing stop-loss on).
I use support and resistance levels a lot in my trading. This also applies when I am going to trail my stop-loss. For example, if I’m long and we are closing above a resistance level on the way to my target, I will usually move up my stop when this happens, behind the candlestick that breaks and closes above it. Why? Because we should not break it again.
Let’s take a few examples.
Example 1:
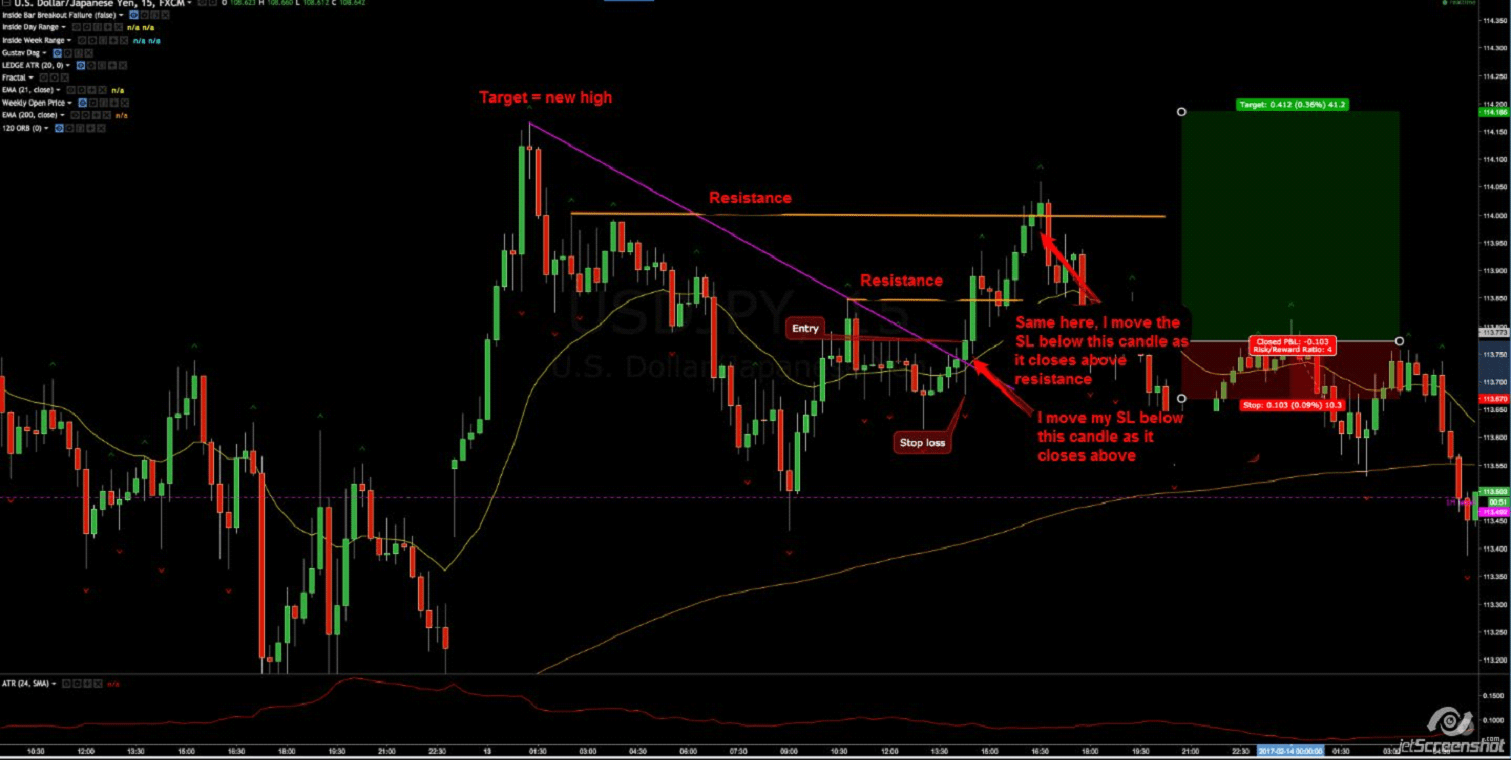
Here we can also see (I did not get it on the graph) that if we had just made a trailing stop-loss with 21EMA, we would have stopped out much later and lower than our structural stop and had just finished Around break-even.
Example 2:
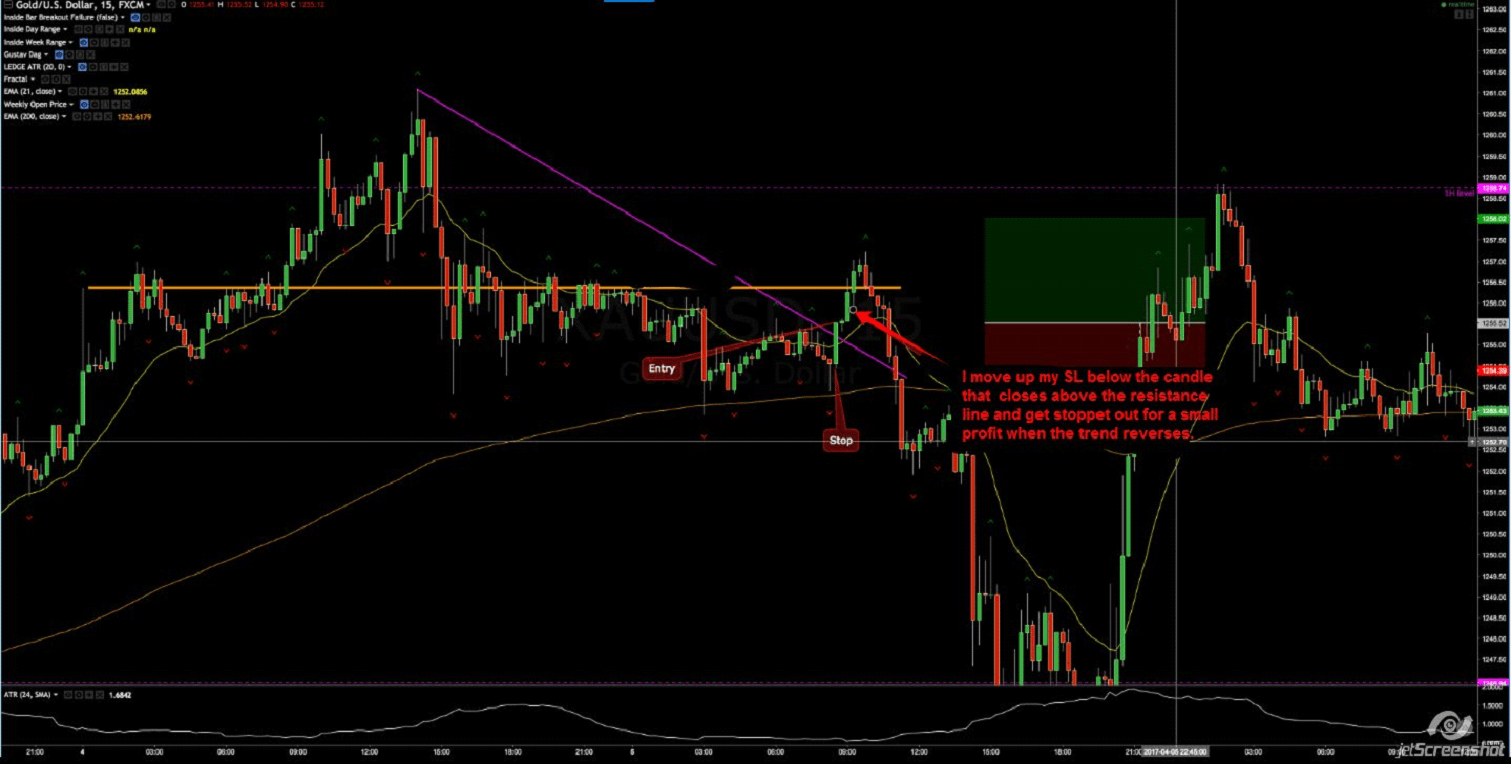
Of course, it does not always work this nicely and it also happens that I get stopped on my structure-stop and the market turns around and hits my target. As mentioned, this is also a more advanced technique than 21EMA, and it requires more experience to use efficiently as one can quickly mess it up by micromanaging trades.
Conclusion
Using a form of trailing stop-loss can be a great idea. Generally, when the Dynamic R starts to deteriorate to a very low value, we need to trail our stop-loss so that we can maintain a favorable situation compared to the current Risk: Reward.
21EMA is a good technique for trend-following strategies and especially for inexperienced traders.
Structure-stop probably gives most sense for traders who already use support and resistance levels in your trading, but it’s definitely my favorite technique for trailing stop-losses.
Those are just two examples of techniques for trailing stop-losses. There are infinitely many more methods, but I just wanted to describe the two I use myself.
If you have any questions, you can either post them under the article or possibly post them in one of our weekly strategy webinars where we can also review similar things.
Video
Below is a video that expands on the article and provides more examples.